
Core
The SoC component of the software consists of trusted and untrusted software. Untrusted software has less privileges and thus a reduced view of peripherals and memory.
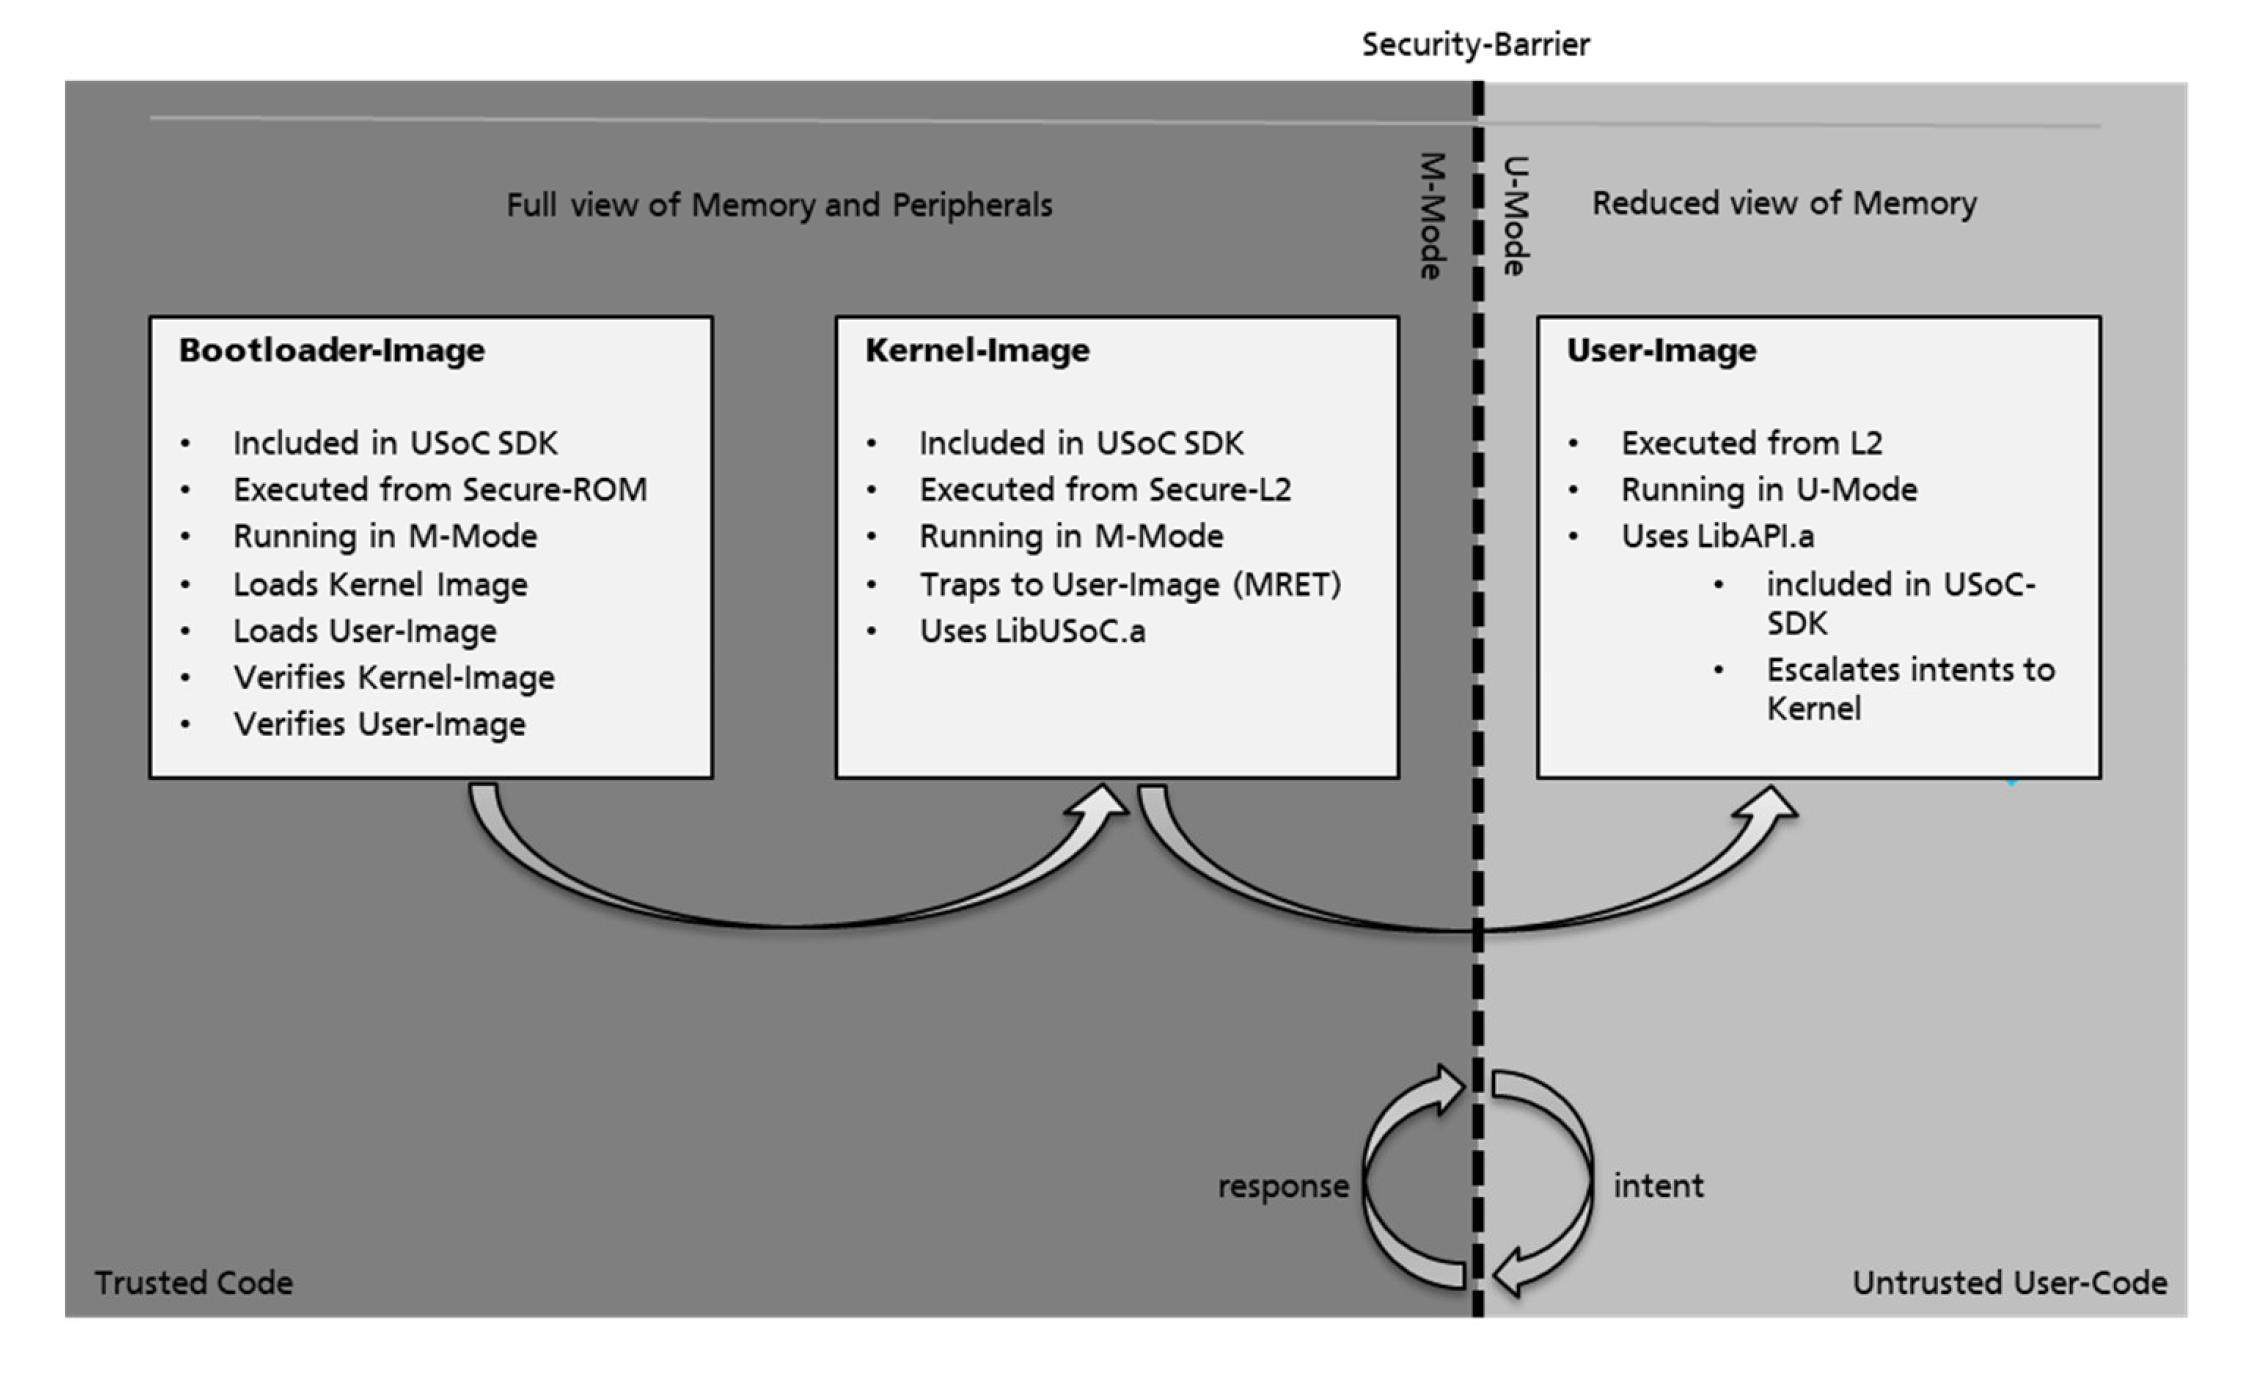
Therefore, the SoC component splits into a trusted Machine-Mode (M-Mode) part and an untrusted User-Mode (U-Mode) part. On startup the DAQU core is executing code in M-Mode. All other cores are halted. After the core was released from reset, the first level hardware bootloader is fetching images from an external source (MRAM, UART) and checking its validity. After this is done, the kernel image is initializing and subsequently switching to the less privileged U-Mode to start the execution of the User-Image. As a security barrier, the access to restricted resources from user mode can only be achieved by intent calls to the kernel. The functions to communicate with the kernel are provided by the libuserapi.a. This library contains all user APIs. Additionally, some of them need the libfreertos.api (Interface API, Socket API). The FreeRTOS integration can also be used to build a task based user firmware.
Tasks
The Ganymed supports concurrency through the usage of FreeRTOS tasks. To use them, you need to define regions in the heap for the FreeRTOS kernel which it will use to dynamically allocate memory for created tasks. There is a global variable usoc_freertos_heap_regions which will contain the allocated memory. It is defined in the file link_usoc_user_config_default.c. Do not forget to add it to your compilation process. When done so, you will be able to successfully run the function vPortDefineHeapRegions to define the needed heap regions.
#include <stdint.h>
#include "middleware/freertos/include/FreeRTOS.h"

int main() {
  usoc_printf("Initializing FreeRTOS heap:");

  extern const HeapRegion_t usoc_freertos_heap_regions[];
  vPortDefineHeapRegions(usoc_freertos_heap_regions);

  usoc_printf(" done\n");
}
To start a task, you need to define a function which then will be run concurrently. It can receive one void pointer to a parameter of any type, so that when you start the task, you can give it some runtime state.
In our example, we define two task functions. One taskA and another one taskB. Both of them contineously print out either Task A or Task B.
Be aware that a task must not return, otherwise the application crashes. Thus always use some kind of infinite loop to keep the task going. If you want to stop a task, use the function vTaskDelete.
#include <stdint.h>
#include "middleware/freertos/include/FreeRTOS.h"

void taskA(void *parameters)
{
  while(1)
  {
    usoc_printf("Task A\n");
  }
}

void taskB(void *parameters)
{
  while(1) {
    usoc_printf("Task B\n");
  }
}

int main() {
  usoc_printf("Initializing FreeRTOS heap:");

  extern const HeapRegion_t usoc_freertos_heap_regions[];
  vPortDefineHeapRegions(usoc_freertos_heap_regions);

  usoc_printf(" done\n");
}
Now that everything is in place, it is time to create a task. To do so, use the FreeRTOS function xTaskCreate. Include the file middleware/freertos/include/task.h to be able to use it.
Since the function gets quite a lot of parameters, let us got through them one by one.
The first parameter is the pointer to the function which should be run concurrently as a FreeRTOS task. The second parmeter is a name for the task.
It is mainly to facilitate debugging but can also be used to obtain a task handle later on. The maximum length of a task name is defined in the global configuration variable configMAX_TASK_NAME_LEN. This FreeRTOS configuration variable and all others are defined in the header file FreeRTOSConfig.h which will be automatically present if you include FreeRTOS.h.
The third parameter is the depth of the stack that will be allocated, ready to be used by the task function. This value is given in number of words, which in case of the Ganymed are 4 bytes per word. We use the configured minimum stack size configMINIMAL_STACK_SIZE.
The fourth parameter is the already mentioned void pointer to arbitrary parameters which will be forwareded to the task function once it is started.
The fifth parameter is the priority with which the task will run. You can define as many priorities as you like.tskIDLE_PRIORITY is the lowest and configMAX_PRIORITIES the largest one. Both of them are also defined in the FreeRTOSConfig.h.
The last parameter is the pointer to the task iteself. If you do not need it, you can also pass a NULL as value.
For both calls to the task create function, we also check the corresponding result to find out, if the task creation was successful.
#include <stdint.h>
#include "middleware/freertos/include/FreeRTOS.h"
#include "middleware/freertos/include/task.h"

void taskA(void *parameters)
{
  while(1) {
    usoc_printf("Task A\n");
  }
}

void taskB(void *parameters)
{
  while(1) {
    usoc_printf("Task B\n");
  }
}

int main() {
  usoc_printf("Initializing FreeRTOS heap:");

  extern const HeapRegion_t usoc_freertos_heap_regions[];
  vPortDefineHeapRegions(usoc_freertos_heap_regions);

  usoc_printf(" done\n");

  TaskHandle_t taskA;
  BaseType_t result = xTaskCreate(
    taskA,
    "TaskA",
    configMINIMAL_STACK_SIZE * 1,
    NULL,
    tskIDLE_PRIORITY + 2,
    &taskA
  );

  if( result != pdPASS )
  {
      usoc_printf("Creation of task A failed!\n");
      return -1;
  }

  TaskHandle_t taskB;
  result = xTaskCreate(
    taskB,
    "TaskB",
    configMINIMAL_STACK_SIZE * 1,
    NULL,
    tskIDLE_PRIORITY + 2,
    &taskB
  );

  if( result != pdPASS )
  {
      usoc_printf("Creation of task B failed!\n");
      return -1;
  }
}
If you run the code now, nothing will happen. One last detail is still missing. We need to start the FreeRTOS task scheduler. It will run and schedule every created task. Use the function vTaskStartScheduler to do so. Note that this function will not return unless it runs out of memory.
#include <stdint.h>
#include "middleware/freertos/include/FreeRTOS.h"
#include "middleware/freertos/include/task.h"

void taskA(void *parameters)
{
  while(1) {
    usoc_printf("Task A\n");
  }
}

void taskB(void *parameters)
{
  while(1) {
    usoc_printf("Task B\n");
  }
}

int main() {
  usoc_printf("Initializing FreeRTOS heap:");

  extern const HeapRegion_t usoc_freertos_heap_regions[];
  vPortDefineHeapRegions(usoc_freertos_heap_regions);

  usoc_printf(" done\n");

  TaskHandle_t taskA;
  BaseType_t result = xTaskCreate(
    taskA,
    "TaskA",
    configMINIMAL_STACK_SIZE * 1,
    NULL,
    tskIDLE_PRIORITY + 2,
    &taskA
  );

  if( result != pdPASS )
  {
      usoc_printf("Creation of task A failed!\n");
      return -1;
  }

  TaskHandle_t taskB;
  result = xTaskCreate(
    taskB,
    "TaskB",
    configMINIMAL_STACK_SIZE * 1,
    NULL,
    tskIDLE_PRIORITY + 2,
    &taskB
  );

  if( result != pdPASS )
  {
      usoc_printf("Creation of task B failed!\n");
      return -1;
  }

  usoc_printf("Start scheduler\n");
  vTaskStartScheduler();
}
Time
To measure time, there is a function usoc_time_get_us which returns the time of how long the device is running in microseconds. To measure a specific time frame, measure the time twice and get the difference.
#include <stdint.h>
#include "usoc_user_services.h"
#include "usoc_soc_control.h"

int main() {
  uint32_t start, end, diff;

  start = usoc_time_get_us();

  //something to spend time
  for(int i = 0; i < 1000; i++) {
    asm("nop");
  }

  end = usoc_time_get_us();

  diff = end - start;

  usoc_printf("Time used: %u\n", diff);
}
Processor Clock Frequency
The Ganymed core has the ability to run at different speeds. To demonstrate that we will create a program that will execute a simple command a predefined amount of time while also measuring the microseconds it takes to do so.
As our simple command we use nop which does nothing and needs exactly one RISC-V processor cycle to be executed. It is accessible through the asm function. Let us repeat executing that command 50 million times.
int main() {
  for(uint32_t j=0; j<50000000; j++) {
    asm("nop");
  }
}
Now we have created a program which does nothing. Let us measure how much time it takes to do so. If you want to know about measuring time there is a tutorial which can be found here.
#include <stdint.h>
#include "usoc_user_services.h"

int main() {
  uint32_t start, end;

  start = usoc_time_get_us();

  for(uint32_t j=0; j<50000000; j++) {
    asm("nop");
  }

  end = usoc_time_get_us();

  usoc_printf("Elapsed time: %u\n", end - start);
}
The elapsed time should be around 1024000 microseconds. It is the value you get using the default clock setting of 100 MHz.
Let us get to the fun part and change the clock frequency. Use the function usoc_soc_clock together with USOC_SOC_CLOCK_200MHZ. It will increase the clock frequency to 200 MHz. Let us make a test.
#include <stdint.h>
#include "usoc_user_services.h"
#include "usoc_soc_control.h"

int main() {
  uint32_t start, end;

  usoc_soc_clock(USOC_SOC_CLOCK_200MHZ);

  start = usoc_time_get_us();

  for(uint32_t j=0; j<50000000; j++) {
    asm("nop");
  }

  end = usoc_time_get_us();

  usoc_printf("Elapsed time: %u\n", end - start);
}
This time around you should get something around 512000 microseconds which is only half of the time from before. The speed of the processors have doubled.
To test all the different clock cycles at the same time let us put the loop including the time measurement into a function. Now we can call this function for every frequency there is.
#include <stdint.h>
#include "usoc_user_services.h"
#include "usoc_soc_control.h"

uint32_t testloop(usoc_soc_clock_t freq) {
    uint32_t start, end;

    usoc_soc_clock(freq);

    start = usoc_time_get_us();
    for(uint32_t j=0; j<50000000; j++) {
        asm("nop");
    }
    end = usoc_time_get_us();

    return end - start;
}

int main() {
    //test different soc clock divider based on 2000MHz PLL
    usoc_printf("SOC clock divider 20 (100 MHz): %u µs\n", testloop(USOC_SOC_CLOCK_100MHZ));
    usoc_printf("SOC clock divider 16 (125 MHz): %u µs\n", testloop(USOC_SOC_CLOCK_125MHZ));
    usoc_printf("SOC clock divider 10 (200 MHz): %u µs\n", testloop(USOC_SOC_CLOCK_200MHZ));
    usoc_printf("SOC clock divider 8  (250 MHz): %u µs\n", testloop(USOC_SOC_CLOCK_250MHZ));
    usoc_printf("SOC clock divider 6  (333 MHz): %u µs\n", testloop(USOC_SOC_CLOCK_333MHZ));
    usoc_printf("SOC clock divider 5  (400 MHz): %u µs\n", testloop(USOC_SOC_CLOCK_400MHZ));
}
Your Output should look something like this:
SOC clock divider 20 (100 MHz): 1024000 µs
SOC clock divider 16 (125 MHz): 819219 µs
SOC clock divider 10 (200 MHz): 512032 µs
SOC clock divider 8  (250 MHz): 409625 µs
SOC clock divider 6  (333 MHz): 307218 µs
SOC clock divider 5  (400 MHz): 256000 µs
True Random Number Generator
A true random number generator (TRNG) is a device that generates random numbers from a physical process rather than by means of an algorithm. This has the advantage that a sequence of numbers is truly random rather than pseudo random. It can be used to increase the security of data encryption or for creating nonces that for example are used in blockchain technology.
In this tutorial we will create a very simple program which will generate 10 true random numbers in two different ways. The first way is by calling the usoc_trng_get_entropy 10 times in succession. The second way we are calling it just one time but we will let it generate 10 random numbers at once.
We can achieve this by passing the amount of numbers to be generated as the second parameter to the function. The first one is a pointer to a memory block large enough to store the requested numbers.
#include <stdint.h>
#include <string.h>
#include "usoc_user_services.h"
#include "usoc_crypto_API.h"

#define NUMBER_OF_DATA 10

void printData(uint32_t *data) {
    for(uint32_t i = 0; i < NUMBER_OF_DATA; i++) {
        usoc_printf("TRNG%02u: 0x%08X\n", i, data[i]);
    }
}

int main() {
    usoc_trng_error_t error;
    uint32_t data[NUMBER_OF_DATA];
    memset(data, 0x00, NUMBER_OF_DATA * sizeof(uint32_t));

    usoc_printf("TRNG Test single call\n");

    //create 10 random numbers
    for(uint32_t i = 0; i < NUMBER_OF_DATA; i++) {
        error = usoc_trng_get_entropy(&data[i], 1);
        if(error != USOC_TRNG_ERR_NONE) {
            usoc_printf("ERROR: 0x%X\n", error);
            return -1;
        }
    }

    printData(data);

    memset(data, 0x00, NUMBER_OF_DATA * sizeof(uint32_t));
    usoc_printf("TRNG Test multi call\n");

    //get 10 random numbers per multi call
    error = usoc_trng_get_entropy(data, NUMBER_OF_DATA);
    if(error != USOC_TRNG_ERR_NONE) {
        usoc_printf("ERROR: 0x%X\n", error);
        return -1;
    }

    printData(data);

    return(0);
}
Magnetoresistive RAM
MRAM is a type of non-volatile random-access memory which stores data in magnetic domains.
The Ganymed has 1 MB of MRAM. It is divided into two segments, a secure one and a global one, which are both of equal size, 512 KB that is. The secure segment is used to store your firmware image, the rest to store your application data.
It is possible to extend the amount of memory by HyperBUS. The additionally attached memory will be seamlessly mapped into the same address room.
Note that 64 KB of the secure MRAM is reserved for the Ganymed kernel. This means that there are 448 KB left for your own code.
Let us write a simple program that writes and reads some data to and from the MRAM. The first step is to accquire a lock on the storage with usoc_storage_get. After usage the lock ha to be released with usoc_storage_release.
#include <stdint.h>
#include "usoc_user_services.h"
#include "usoc_storage_API.h"
#include "usoc_storage_mram.h"

int main() {
    usoc_storage_lock_t lock;
    usoc_storage_get(&lock, USOC_STORE_MRAM);

    usoc_storage_release(&lock, USOC_STORE_MRAM);
}
After the storage got locked we can access it. With usoc_mram_write_word we can write to it, with usoc_mram_read_word we can read from it.
Both of these two functions get an offset parameter. It is used to read from and to write to a certain point in the memory relative to the starting point of the address room of the MRAM. Note that reading uses a 32bit aligned offset while writing uses a 64bit one. This means that in the case of reading, your offset needs to be a multiple of 4 while in the case of writing it needs to be a multiple of 8.
#include <stdint.h>
#include "usoc_user_services.h"
#include "usoc_storage_API.h"
#include "usoc_storage_mram.h"

int main() {
    usoc_storage_lock_t lock;
    usoc_storage_get(&lock, USOC_STORE_MRAM);

    uint64_t write_data = 0x46A9BC3045BCD3EF;
    usoc_mram_write_word(&lock, USOC_STORE_MRAM, 0, write_data);

    uint32_t data;
    usoc_mram_read_word(&lock, USOC_STORE_MRAM, 0, &data);
    usoc_printf("%X\n", data);
    usoc_mram_read_word(&lock, USOC_STORE_MRAM, 4, &data);
    usoc_printf("%X\n", data);

    usoc_storage_release(&lock, USOC_STORE_MRAM);
}
Output:
45BCD3EF
46A9BC30